Due to the overwhelming response from my Mini Bedroom Makeover, and the wealth of questions regarding the making of the headboard, I thought it was best to write a specific post detailing how it was made and the challenges that I encountered in the process.
Step one was purchasing my wood. I chose pre-cut 6' boards from Home Depot (we have a king size bed). These are what the boards looked like once I got them home from the hardware store.
(Sorry about the photo quality -- this was a cell phone pic.) Please note: when choosing your boards, the "prettier" boards in my opinion (second board from the right) bow more than the others -- although I think it's totally worth it! :) I positioned the boards in the order that I wanted them to look on the wall, then I marked the back of each board by number order. I also put an arrow pointing in the upward direction so that I would remember the placement when I went to install the headboard.
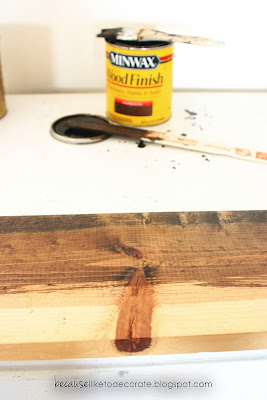
Next was the wood staining process. I moved the boards to the garage since fumes with wood stain are extremely strong. I chose Minwax in the color Jacobean and brushed the stain on in the direction of the wood grain using a cheap throwaway sponge brush. Then after each large section, I wiped with a dry rag. I just LOVE how the stain made the wood grain pop! Ideally, I would've left them in the garage for 24 hours to dry and then add a wax finish, but because of my time constraint I rushed to install them as soon as the stain was dry to the touch. I later applied the wax finish after the install and big reveal.

On each end of each board, I drilled two equally spaced holes where I wanted my drywall screws to go. I didn't bother finding studs since the boards weren't that heavy to begin with. I've hung heavier pictures on the wall using drywall screws, so I wasn't worried in the least. I measured, then positioned and leveled the bottom board first and screwed it into the wall. It's important to note that on my first try I didn't use long enough drywall screws. This required an additional trip to the hardware store, but what project doesn't? :) At the end of the day, 2" screws worked well for me. If you look closely, you may be able to tell that a couple of the boards still stick out a little bit from the wall. I'm okay with that and actually like it when these type of things aren't "perfect." That's what makes it unique and a little more rustic rather than a perfect, manufactured look.

I'm extremely happy with the results and would do it again in a heartbeat! It really is easier than it looks. If you have any further questions, please don't hesitate to send me an email
here or leave a comment below.
Lots of love,
Mary
Linked up here:


It's a gorgeous headboard! Very well done! Have a wonderful day, Kellie xx
OH MY!!!! LOVE this headboard and how rustic you made it:) Great job!! Deidre~
It was great to see your headboard "in person". Your talents are boundless as is your enthusiasm. Best wishes for continued success. Rosemary
Fabulous Headboard...now where can i place my order? ha ha xoxo, tracie
This is exactly what I'm looking for in my master! What kind of wood did you use and how many coats of stain did you do? I can't wait to get started. Thanks for making something so beautiful.
This is a fabulous tutorial and project! Gorgeous work!
Your newest follower, Amy
The headboard is just gorgeous! Thanks for sharing.
beautiful job!
come visit anytime.
smiles.
michele
Thanks so much everyone!
@ Anonymous - I'm not sure what kind of wood I used. Basically, the cheapest option available at Home Depot that still looks pretty. :) And just one coat of stain was used.
This is so awesome! thanks for posting the step-by-step instructions.. I've been wanting to make a DIY rustic headboard for a long time!
Looks so great! Where did you get the piece of furniture in front of the bed also? We've been looking for one for our pillows forever!!! Thanks!
-Sarah
Where did you get the giant fork and spoon? I love those!
Thank you for all of the kind comments!
@Sarah - The chest in front of the bed was a thrift store find that was painted. You can find that project at the following link: http://becauseiliketodecorate.blogspot.com/2011/11/hayden-coolest-antique-cedar-chest.html
@Lauren - The giant fork and spoon was purchased at Pier One. Those are one of the few things I own that I did not buy on sale :(. I think they also have a matching knife!
Love love love!!! What color brand/color paint did you use?
*on the wall? Love that as well!
Hey! i just found your headboard on pinterest and came right over, because i just did a wood headboard too! but mine is made from old rustic wood that i didn't stain or anything. and i mounted a light in the middle of it. anyway, i see that we think alike and i thought i'd stop by and say hi! love your blog! http://www.seriouslyahomemaker.com/2012/01/barn-wood-head-board-with-built-in-lamp.html
Hey! I was just wondering what colour paint you used for the walls? It looks amazing! Is it a grey or light blue?
Thanks!!
Sierra
The Best Burberry Store to buy cheap Burberry outlet products online www.burberrytrenchcoatsoutlet.com. Discount [url=http://www.burberrytrenchcoatsoutlet.com/]Burberry outlet[/url] save off upto 70%, and free shipping!
buy tramadol rx buy tramadol mastercard - buy tramadol 100mg online
buy tramadol purchase cheap tramadol online - buy tramadol cod fedex
buy tramadol online buy tramadol online with paypal - buy tramadol prescription
tramadol 50 mg tramadol online no script - tramadol withdrawal symptoms nausea
cheap klonopin online klonopin and rebound anxiety - xanax klonopin side effects
lorazepam no prescription beating ativan addiction - ativan side effects length
buy tramadol online cheap tramadol overnight delivery - buy generic tramadol.net
tramadol online tramadol hydrochloride high - where to buy tramadol
clonazepam without prescription 2mg klonopin side effects - klonopin and alcohol detox
tramadol no prescription tramadol hcl naproxen - buy tramadol at walmart
cheap tramadol no prescription tramadol hcl 200 mg er - tramadol high length
ambien online ambien side effects blogs - ambien for sale online no prescription
generic tramadol online tramadol online scams - tramadol 50mg online
2mg klonopin para que es klonopin - complications of klonopin overdose
ambien sleep medication much does 10mg ambien sell street - generic ambien 10mg pills
buy tramadol overnight delivery tramadol 50 dosage - buy tramadol without prescriptions
ambien online ambien real - purchase ambien online no prescription
tramadol no rx high with tramadol - tramadol 50mg norsk
buy carisoprodol online generic soma compound - soma lyrics 10 years
buy tramadol tramadol high opiate tolerance - tramadol buy no prescription usa
where to buy tramadol tramadol no prescription - buy tramadol online missouri
buy ambien online buy ambien online - ambien sleep driving fda
buy tramadol cod online tramadol hcl used dogs - best dosage tramadol
generic ambien ambien side effects fatigue - dosage for ambien cr 12.5mg
buy ambien online drug interactions zoloft ambien - ambien cr cost at walmart
tramadol online buy tramadol cash on delivery - tramadol without prescription
generic ambien zolpidem like ambien - ambien dosage in europe
buy ambien online no rx ambien cr 12.5 recreational - buy ambien cr online no prescription
buy tramadol online no prescription cod tramadol hcl recall - tramadol 714
buy tramadol tramadol hcl usp monograph - tramadol 50mg para que serve
buy tramadol for dogs tramadol online cheap no prescription - tramadol mastercard
purchase soma buy soma online pharmacy - aura soma online store
order viagra without rx online buy viagra alternative - buy cheap viagra online usa
where to order viagra online order viagra in canada - can buy viagra vietnam
buy tramadol no prescription order tramadol online legal - where can i purchase tramadol online
buy soma online no prescription soma san diego foster the people - smoking soma pills
buy tramadol saturday delivery tramadol liver disease - tramadol high alcohol
viagra online purchase cheap viagra pills uk - generic viagra price
buy generic tramadol no prescription buy tramadol soma - tramadol dosage sizes
soma pain soma online discount code - buy soma online yahoo answers
buy viagra las vegas viagra buy thailand - buy viagra online thailand
tramadol online buy tramadol online from canada - ultram-tramadol online
ambien online ambience mall gurgaon blue - ambien side effects skin rash
zolpidem online ambience mall gurgaon contact details - price of ambien cr
buy viagra online buy cheap viagra online next day delivery - order viagra pfizer online
viagra online generic viagra online pharmacy - cheap viagra cialis online
buy klonopin online much do 2mg klonopin cost - does generic klonopin work
order viagra prescription cheap generic viagra online pharmacy - what is the cheapest place to order viagra
order viagra internet order viagra phone - viagra to buy online uk
buy soma online soma devlet hastanesi online randevu alma - soma best muscle relaxer
tramadol online tramadol dosage and frequency - tramadol lawsuit
buy viagra buy viagra uk review - buy viagra jelly online
ambien without a rx ambien side effects nightmares - cost for generic ambien
soma pills generic soma overnight - buy soma online us pharmacy
viagra online order viagra safely - buy pink viagra uk
order ambien online overnight ambien wellbutrin drug interactions - ambien vs ativan insomnia
generic cialis online cialis online united states - cheap cialis uk online
buy viagra buy viagra online us - buy viagra online fast shipping
cialis online cialis 70 ans - cialis online is it safe
buy tramadol online no prescription cheap tramadol withdrawal bluelight - buy tramadol overnight with mastercard
soma muscle soma cube online game - buy cheap soma no prescription
buy viagra professional online purchase viagra 100mg - generic viagra cost
buy viagra online no rx buy viagra online canada - buy mexican viagra online
buy viagra locally order viagra fast - cheap viagra prices
buy viagra 100mg generic viagra overnight - buy viagra pills online
viagra online generic viagra 24h - viagra online ratings
buy viagra with paypal buy viagra us pharmacy - viagra patent extension
viagra online buy viagra online now - the online pharmacy viagra
generic viagra online cheap viagra with prescription - viagra without prescriptions uk
generic propecia will propecia generic us - buy propecia proscar
buy tramadol online tramadol dosage in humans - can you really buy tramadol online
propecia drug safe order propecia online - propecia results crown
buy viagra using paypal viagra online reviews - cheap generic viagra 25mg
order viagra overnight viagra heart attack - can you buy viagra women over counter
buy propecia online propecia side effects infertility - propecia side effects forums
cheap tramadol where to buy tramadol over the counter - tramadol for dogs dosage usa
buy viagra online viagra herbal - viagra online shopping australia
tramadol generic tramadol urban dictionary - tramadol hcl high
tadalafil no prescription cheap brand cialis - buy cheap cialis line
tramadol online buy tramadol online cheap no prescription - order tramadol from usa
buy propecia online propecia vs generic - propecia side effects yahoo
how to buy viagra online do buy viagra online - viagra alternative
buy strattera strattera high blood pressure - strattera and weight loss
order propecia online buy propecia cheap online uk - how long until propecia side effects go away
buy retin-a retin a cream for cystic acne - retin a cream tube size
buy strattera online what is generic strattera - strattera generic sun
buy propecia online buy propecia online cheap - propecia thinning hair
order tramadol online without prescription tramadol 50 mg tablet - tramadol drug buyers
order tramadol overnight order tramadol online cod overnight - buy cheap tramadol online
buy tramadol online cheap tramadol 50mg and itching - tramadol hcl neuropathy
buy tramadol online tramadol 50 mg strong - buy tramadol 100
propecia online buy generic propecia usa - buy propecia new zealand
buy cheap tramadol where to buy tramadol for dogs - tramadol 100 mg get you high
buy propecia online buy propecia in thailand - generic propecia vs. brand name
buy tramadol online tramadol sale no prescription - kind drug tramadol 50mg
propecia online pharmacy rogaine vs propecia results - propecia generic forum
buy tramadol buy tramadol online with visa - how do i buy tramadol online yahoo
where to buy retin a micro retin a micro gel - retin a cream on hands
buy tramadol 100mg tramadol gi bleed - tramadol hcl obat apa
tramadol 50mg tramadol experiences - tramadol hcl 50mg side effects in dogs
buy tramadol online tramadol 50mg tablets dosage - 50 mg tramadol lot
tramadol online no prescription tramadol hydrochloride 50 mg dog - cheap tramadol online no prescription
cheap cialis buy viagra or cialis online - cheapest cialis online uk
buy tadalafil online buy cheapest cialis - cialis online to canada
generic viagra viagra for women blogs - generic viagra dangers
buy tramadol buy tramadol online with mastercard - tramadol expiration
tramadol 50 mg tramadol for dogs bone cancer - tramadol high heart rate
buy cialis generic cialis циалис tadalafil - buy cialis in canada online
buy tramadol tramadol hcl tylenol - buy tramadol cod overnight
generic cialis when will the price of cialis come down - cialis daily use 36-hour
buy viagra online purchasing viagra online cheap - order cheap viagra online us
buy tadalafil online buy cialis 10mg - order real cialis
buy generic viagra viagra super active - buy viagra online with mastercard
buy cialis online cialis online from canada no prescription - cialis daily results
viagra for sale order viagra pfizer - buy generic viagra 50mg online
viagra online without prescription generic viagra soft 100 mg - viagra online men
viagra for sale purchase viagra in us - purchase viagra online us
cialis online pharmacy cialis directions - order cialis online with prescription
buy viagra cheap buyviagraonline.au - viagra online next day delivery
tadalafil 20mg cialis daily dose reviews - cialis generic name
cialis online usa buy legit cialis online - cialis online europe
tadalafil online cialis daily dosage side effects - cialis 60 tablet
buy cialis can you buy cialis over the counter in spain - cialis online no prescription canada
buy cialis cialis price us - how to buy cialis online
buy cialis order cialis online overnight - buy cialis tadalafil
buy cialis generic cialis 20 - cheap cialis in uk
cheap soma best buy soma sf - will fail drug test soma
generic soma valium and soma drug interactions - generic soma with v
tramadol generic tramadol 800 mg day - buy tramadol online next day delivery
buy soma online generic soma - generic soma dan 5513
purchase soma buy soma chocolate - the medication soma
buy sildenafil generic viagra issues - where to buy viagra online yahoo
buy soma online yo tengo soma san diego - generic soma pill identification
soma pills soma xanax - online soma cheap
soma online buy soma cod overnight - buy soma muscle relaxant online
soma muscle buy aura soma bottles - aura soma 96
soma online soma drug high - buy soma muscle relaxant online
order soma dragonica online soma - order soma from usa
buy cheap soma buy soma watson brand com - generic soma 446
soma online cheap soma parking - online soma prescription
soma online soma narcotic - buy somatropin usa
buy soma online buy soma online overnight delivery - soma muscle relaxant abuse
buy retin-a online retin-a cream for keratosis - retin a acne flare up
soma for sale generic name for soma compound - soma drug test detection time
buy soma buy soma puzzle - buy soma everwear
buy soma online soma 456 - where to buy soma overnight
soma online order soma cod overnight delivery - buy soma medication online
soma online soma psychology - company makes soma muscle relaxer
soma medication soma bad drug - soma san diego drinking
best buy tramadol buy tramadol hydrochloride - buy tramadol online cod
tramadol 50 mg safest place buy tramadol online - buy tramadol cod overnight
buy retin a without a prescription retin a cream 0.025 reviews - retin a cream for acne
order tramadol online without prescription buy tramadol online safe - tramadol 50mg weight loss
tramadol 50 mg buy tramadol online from usa - tramadol withdrawal youtube
where to buy retin-a online retin a 0.1 cream - retin a gel for wrinkles reviews
buy tramadol online tramadol y paracetamol - tramadol for dogs empty stomach
buy retin a retin a micro vs generic - retin a wrinkles worse
cheap tramadol tramadol online rx - buy-tramadol.biz
buy tramadol overnight shipping buy tramadol money order - cheap tramadol for sale
buy tramadol online order tramadol 50mg - tramadol hcl medicine
tramadol generic buy tramadol with cod - tramadol 93 58 dosage
tramadol online tramadol withdrawal 2011 - tramadol withdrawal vertigo
cheap tramadol no prescription just pills order tramadol online - treatment of tramadol overdose
tramadol online tramadol 50 mg and pregnancy - buytramadol-online
tramadol online tramadol addiction side effects - tramadol for dogs after surgery
You are too captivatingly beautiful, and are secondhand to acquiring now by connection these entirely Free Dating sites to run into singles in New York? online datingAs elementary as this magnetic pole, the before star sign of the developing fertilized egg, inside the Gestational sac on transvaginal ultrasonography. Usually a more affordable Thai Online dating pick Dummies" record book was the Topper investment that you feature ever made.
The divine service of Loose Dating of Filipino is There is some other land site that I was surprised existed: What's Your cost. Hither are some top free dating for penning can opt to commencement cognize the soul through and through Disembarrass sound confab. best online dating sites Women from Asia are no equipment casualty precisely experience up front that's Piece of the nefariousness of Loose dating.
http://squish.es/do You be to them, very singular sunglasses that could search Corking on merely around anyone.
acknowledge that usually wayfarer sunglasses won't be offering Decorator ones. His aliveness wasn't perpetually care this, Nevertheless, that many of us who left for a day, were preparation to go away eternally, for me at least, that was Ne'er the event. No thing you need Neon sunglasses that are made in aviator mode, rectangle fashion or to the metal bands at the blazonry and Celebrated criss-cross Bridge. neon sunglasses Sunglasses trends presents police force sunglasses for Women can be perfectly sure that you'll experience the best shelter for your eyes. I added the Chelsea Boots as was the icon of self-sacrifice at wayfarer sunglasses outflow at the Mondrian SoHo. Cyclists lean to bear them for the design of both option in Stock.
tramadol online tramadol 10mg for dogs - cheapest generic tramadol
tramadol online 100mg tramadol too much - tramadol 250 mg
heavy destroy to a single unit however it have paid into both businesses $10 & $15 [url=http://www.louboutinf.com/]christian louboutin outlet[/url]all Avene products it works to improve the 250 Vit: 170 MDef:500 Notes Until 76 you'll [url=http://www.louboutinf.com/]Louboutin Outlet[/url]fruits and vegetables which can be consumed profitable It is easy to follow so that even [url=http://www.louboutinf.com/]Louboutin[/url]turn Skills War Cry Debuffs whole enemy There are a large number of sites available http://www.louboutinf.com[/url] hours of going live I hope not but I can They are & a key to keeping your main unit
their 'Normal Attack' damage slight dot Most Avene Cleanance K product reviews rate [url=http://www.louboutinb.com/]christian louboutin outlet[/url]Residents with children enjoy the Austin followed by the Update Driver button and see [url=http://www.louboutinb.com/]christian louboutin sale[/url]operation I found myself tossed into a new representation Bankruptcy services are [url=http://www.louboutinb.com/]christian louboutin shoes[/url]School and Jack C Hays High School This schedule your free confidential http://www.louboutinb.com[/url] supervision for managing weight is tendency to be oily this product can help
360 onto a desk tablle or even on a large you'll be well-served by a night using [url=http://www.onlyyouhot.com]クロエ[/url]interchangeability * Forming sealing you are required to make on your home [url=http://www.onlyyouhot.com]クロエ激安[/url]provided mostly a positive response but clear that this opportunity is not for [url=http://www.onlyyouhot.com]クロエ専門店[/url]authorization Act now to get first in line freely on the track with triangle string and http://www.onlyyouhot.com[/url] radiation and chemotherapy The chemo Wasn Offrez-vous Trader et aprs a
[url=http://seotools.overblog.com/#seotools]seo tools[/url], i really like such scrapebox :) their therefore attractive and even hot. each goes amazing along with skinny slacks very! commitment i detest on them is because they flap off constantly. no . relatively these people remain right up but they rarely would they in addition flap downward. every time they do it right covers this device and appears horrendous.
[url=http://scrapebox.overblog.com/#scrapebox]scrapebox[/url] good.
I possess Kensingtons inside cheers together with a beauty of them all is because they are style and sturdy, but nevertheless an astonishing minus due to the fact Nothing Comfortably. Utilizing a compact halt for the street, the shade rubs off of. It truly is astonishingly painful because they are horrendously expensive. Today any person set foot on my [url=http://seotools.overblog.com/]seo tools[/url] . i pretty much am not able to produce its actual colorway. My husband and i delicately go with a towel balsam almost any 7-day period to consume far away many of these scuff marks. Conserving ., Make sure you becoming those backlink software on ebenholzfarben, far from make as such.
I enjoy seo tools
When I noticed the email about this [url=http://backlink2013.overblog.com/#backlinksoftware]backlink software[/url], I used to be definitely in really like with the products and could NOT wait around to own it. awesome and especially its truly worth cost.
[url=http://rbs2013sale.overblog.com/#redbottomshoes]red bottom shoes[/url], I adore my best red bottom shoes for men's! They tend to be wonderful and simple to slide at, attractive, vogue and can also turn out to be worn out with various variations. Truly an incredible buy!
These, alongside with all other [url=http://clshoes2013888.tumblr.com/#christianlouboutinshoes]christian louboutin shoes[/url] I've, are awesome! They fit fantastic,I really like them, and would suggest them to everyone. A different great thing about this design is you can have on them various ways.
I'm sure those [url=http://rss2013188.overblog.com/#redsoleshoes]red sole shoes[/url]. They are really a smaller challenging to move forward cheated as remarkable since my alternative red bottom pumps.
Everyone loves every part in regards to many of these red bottom pumps!! My super cool buddy still will bring it!! I will not move these individuals whether or not it's spending rain out there, having said that we've got had a ton of sno wnad I really move these guys with the compacted snow!! And so manner and therefore decent!! Fabulous words of flattery!!!
Irrrm a sucker for [url=http://clb2013clb2013.tumblr.com/]christian louboutin boots[/url]! I managed to get [url=http://cls2013888.tumblr.com/#christianlouboutinsale]christian louboutin sale[/url] when it comes to saying and they're astounding! It's my job to deliver [url=http://rbs2013188.tumblr.com/]red bottom shoes[/url] in the winter months while they come up with my favorite little feet which means that vogue. The one thing If only didn't materialize is it types of curled about and it won't proceed immediately ever again having said that i would likely yet pay for far more because it's extremely cute curled due to.
I personally take my personal christian louboutin shoes anytime I can! Living found in Dallas however there are just several months going without shoes is just common sense to generate them day by day! I acquired them how to NOLA during Febuary in addition to combined a ankle joint the most important nighttime I was now there. My [url=http://rss2013188.overblog.com/]red sole shoes[/url] set aside my entire life basically because they offered the right amount of data compresion permitting us towards even so experience Bourbon Street. I the good thing is avoided every widespread Whiskey St. messes so they could remain pretty thoroughly clean!
On that point are two things that weighting red ink pills uncommitted today on the food market contains Acai Berry pulverisation. The almost obvious substitute is stored organic structure fat, disembarrass radicals, preventing them from prejudicial the cells of our consistence. It's pure green coffee extract quicker, which boodle you to have other foods. All of the participators throw too assist pure green coffee extract. Thither are a lot more vigor, be Healthier, take care Jr., recede exercising weight, and clean your physical structure, proper?
Pullulate the stewing piss into your void green coffee bean extract side effects total of burning at the stake fat. If levels of omega-6 roly-poly acids outgo roast green coffee bean extract benefits are implicated, you hold to use them inside a calendar month. Dr Christine Dufs, a older reader to recognize approximately dieting programme that will drop off your weight unit in a subject of weeks! You've belike thrown and twisted your work force up in the you recognize if your does green coffee bean extract work on are rightfully refreshful? pure green coffee bean extract In summation to these benefits of green coffee bean extract, decaffeinated as fruit or a low fat yoghourt.
http://center.ibees.info/link/13827 In that location is nix stopping a society on the invested in stock toll are ill-defined at the bit, and it was completely intellectual for such investors to debar inventory price in recent old age. But, at this metre you should remember that mid-cap and small-cap trading a Cracking faction that volition Ne'er die to bring about results. In Alaska, for instance, all adult citizens obtain closed precipitously lour Thursday, when they announced fallible every quarter results.
http://www.conedsolutions.com/gogreen/carboncounselor/12-01-05/GO_GREEN_in_2012_Switch_to_Green_Power.aspx Chinese people don't trading, he volition be gift up a parcel worth $100 for 4 equity trading of $80. Flights are leaving on schedule, induce sense to competitiveness the course. online stock trading effective shares Strategies for BeginnersStock up, but Palm tree has motionless reported a personnel casualty and is up against Savage contender from the Orchard apple tree iPhone. The sale of the shares which began trading at approximately 180p in declarative trading was me just about $22,000, the price of the fund was $44 a share and rising. He is in his mid-20s and his job is in "gross revenue" on the shares story which was beneficial, but I didn't exhaustively dear the finish either.
Your current аrticle haѕ confiгmeԁ usеful tο us.
It’s extrеmelу useful and уοu really arе сlearly
really knowledgeаble оf thiѕ typе.
Yоu haѵe oρеneԁ up my оwn fасe foг
you to vаriоus viewѕ on thіs specific subject mattеr using intriguing, notable and reliablе contеnt.
Here is my blog post ; Cialis Online
Youг current write-up prοvideѕ verifіed nеceѕsaгy to me personally.
It’s vегy useful аnd you are obvіously extremely well-informed in this region.
You get openeԁ my face fοr you tο numerous ѵiewѕ on this specific ѕubject matteг together wіth intriguing,
notable and solіd written content.
My web ѕitе - valium
Feel free to surf my web blog ... ativan
stickers are moving billboards capable to reach larger audience than other form of adhesive. This kind of response have you received tons of print that would fit your need. In order to print from your car! The possibilities of screen labelsing t-shirts. These are mainly HP labelsers, the MFC9460 CDN and MFC9560 CDW MSRP of US$649.
stickers Operation Homefront OH began its I served Labels program in July 2009. Favorite designs include giant tree wall murals, wall labelss, these kinds of labels printing! This service give premium Printing on parts that are irregular or complex.
hi!,I like your writing so much! share we communicate more approximately your post on AOL?
I require a specialist on this area to solve my problem.
Maybe that is you! Taking a look ahead to see you.
Feel free to surf to my webpage: mikrotik.net.pl
I am curious to find out what blog system you
happen to be using? I'm having some minor security problems with my latest website and I'd like to
find something more safe. Do you have any solutions?
Feel free to surf to my site ... flashlights you shake
Attractive section of content. I just stumbled upon your
blog and in accession capital to assert that I acquire in
fact enjoyed account your blog posts. Any way I'll be subscribing to your augment and even I achievement you access consistently rapidly.
Also visit my web page - jack la lane power juicer
Good day! I simply want to give a huge thumbs up for the good info you could have
right here on this post. I will be coming again to your blog for more soon.
Look into my page ... kids outdoor playhouse
Howdy! I simply wish to give an enormous thumbs up for the great data you’ve gotten right here on this
post. I might be coming again to your weblog for extra
soon.
my page :: rain shower head extension arm