Blog has moved, searching new blog...

Powered by Blogger.

Showing posts with label Wall Art. Show all posts

DIY custom scrap wood art - FREE


on , , ,

1 comment

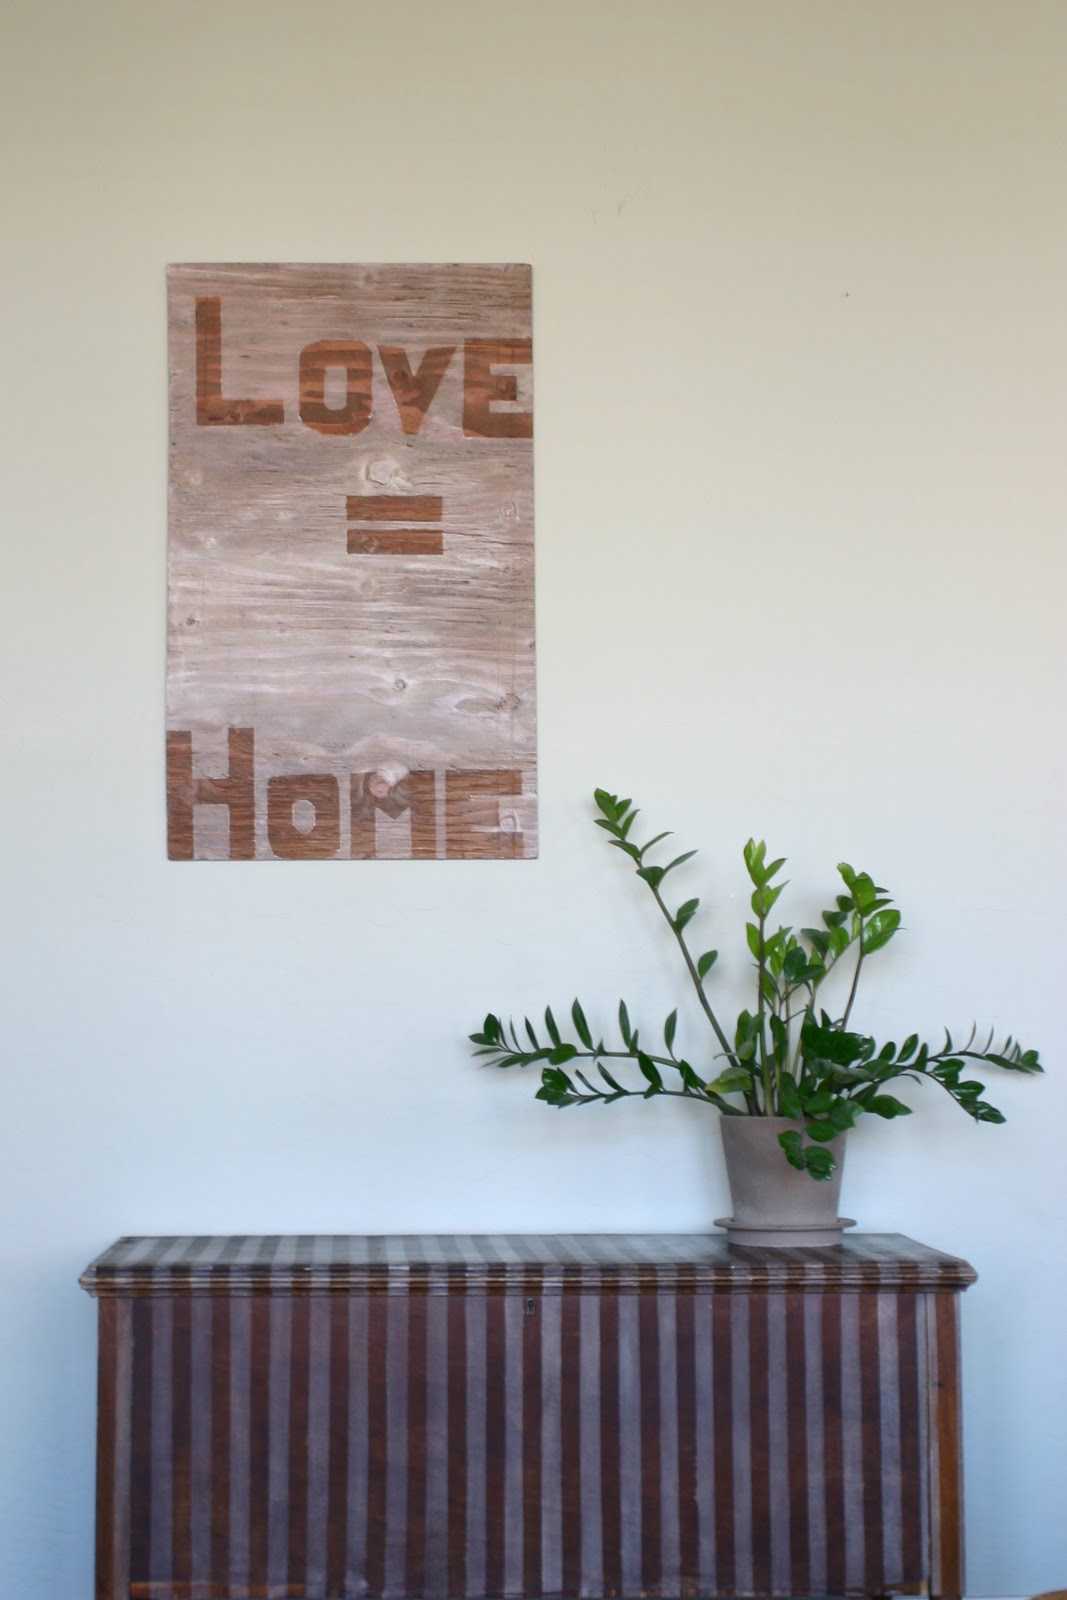
Yep, I said free! Check out Craigslist in your area. I picked up about a dozen scrap pieces of wood in various sizes at no cost. The paint and wood stain that I used was just what I had on hand from other projects. I would encourage you to just use what you have.

My first step was to brush the entire board with Minwax bombay mahogany wood stain. I used two coats and let dry for 24 hours.

Next, I used some painters tape to map out my letters, etc. Then, using a whitewash solution of Annie Sloan chalk paint in pure white, I used a rag to rub the paint into the remaining portion of the board and was careful not to let the solution bleed underneath the taped portion.

The artwork was finished with AS clear wax and polished smooth. The wax really helped smooth the rough edges of the board and provided a nice finished product. I'm very pleased with the results and can't wait to make more with my remaining scraps!


Lots of love,
Mary

Chevron wall accent panels


on , , ,

45 comments

Do you remember the chevron wall panel that was used to stage "Chloe - A vintage drexel heritage desk"? I received a lot of feedback and questions on the chevron panel, so I thought I would share how and why that project came to be.

I actually painted two panels. They are large 8' x 4' sheets of plywood from the hardware store. I paid about $8 a piece for them. Honestly, the decorative accent panel was an afterthought. The original use was to create a make-shift table for our church's college group Thanksgiving party last year. We needed a table that would seat about 18 people and rather than rent, we decided to make something up.

After the party was over, I had two large sheets of plywood and was determined to do something with them. As I looked at my living room wall where the television is, it just didn't look complete. Our plans are to one day have a media built-in and stone fireplace installed on that wall. But for now, I needed some sort of visual interest in that space. Something to fill up the 9' ceilings but not look too cluttered (because the TV is on that wall).
I started by painting both boards white as a backdrop. Before deciding on the chevron print, I actually starting a damask print using a homemade stencil. I got about half of one board done and decided it looked way too busy for that space...so I started over.

I used a ruler and pencil to measure and trace out my design, then taped and painted the wall color to create the chevron stripes. I'm happy with it (for now), and hopefully it can tide me over until we can focus on the ultimate goal.


Lots of love,
Mary


Linked up here:
> ”Domestically Organize and Decorate Everything Laugh, Love, & Craft The DIY Show Off

DIY oversized growth chart ruler


on , , , ,

29 comments

I did it! I think this was one of the first ideas that was pinned from Pinterest that I actually executed. The girls have been growing so fast and I felt like each day that went by I was missing the opportunity to capture those memories. So off to Home Depot I went!

This is a photo of my final product:

And here is the original inspiration photo that I saw on Pinterest. Different versions of this are all over the internet these days. I believe this idea was originally done and sold by Pottery Barn, then all of the DIYers (like myself) decided, "Hey, we can make this for WAY cheaper."

If you know me, you know that I'm not one for following directions well. I like to find shortcuts at every turn and I often get myself in trouble because of it. In my defense, I also find some terrific shortcuts! All that to say, I haven't read any of the other tutorials out there. I bet they are fantastic and way better than mine. I can imagine it's been done with paint and probably even cut out laminate pieces. I'm too impatient and I just looked at the photo and went for it.

So I started by purchasing a piece of wood from Home Depot. You may not know it, but they sell pre-cut and pre-finished wood pieces in various sizes. I didn't know that until just recently. I picked up a piece of pine wood 6' tall and 9" wide.
I wasn't about to try and paint the letter detailing with a brush because, quite frankly, I don't trust myself to paint that well without a stencil. And I was too impatient to run out and get a number stencil, so I decided to freehand with pencil first using a small scale ruler as my guide for the font. Then, I used a Sharpie over the pencil for the permanent markings. It worked extremely well. I was concerned that the Sharpie would bleed, but as it turns out I didn't have any trouble with that at all.

I then coated the entire board with Minwax Bombay Mahogany wood stain, let it dry, then finished it off with a light coat of Annie Sloan soft wax. I used wax rather than polyurethane because I didn't want to deal with the smell and I just love the finish of soft wax. It's easy to use and provides a nice, smooth texture without being too shiny.

I'm more than pleased with the results! This is now such a treasured piece in the home. I look at it daily and imagine all the markings that we get to imprint over the years as our children grow.

After purchasing and trying out several pens, I finally found one that would write over the nice wax finish. Again, good ol' Sharpie -- I found out that they make a paint pen! Worked like a charm. :)

By far, this is one of my favorite projects to date!


Lots of love,
Mary


Linked up here:
Lovely Crafty Home